Using Google Docs, Data Explorer and PowerPivot for Questionnaires
Reposted from Chris Webb's blog with the author's permission.
You may have already seen that the labs release of Data Explorer is now publicly available; there’s a whole load of really useful resources available on the learning page too if you’re interested in finding out more about it. I’ve been very lucky to have had early access to Data Explorer, and to test it out I put together a simple demo using the cloud service that shows off a typical use-case.
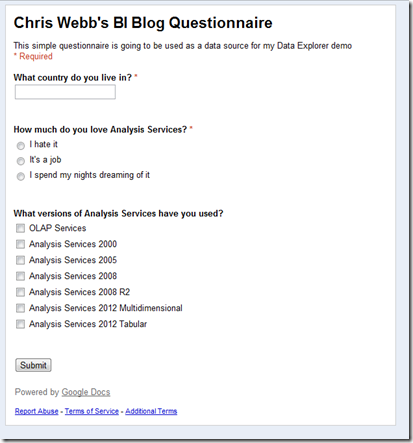
The first thing I did was to use Google Docs (just to have a cross-platform demo, not because I love Google in any way, honest…) to create a simple questionnaire using Google Forms. Before you read any further, please go and fill out the questionnaire I created here:
https://docs.google.com/spreadsheet/viewform?formkey=dDRnNi1fbkotLVd6Q0g4MmhsdFV2OGc6MQ
Don’t worry, there’s only three questions and it’s all non-personal data! For those of you reading offline, here’s a screenshot:
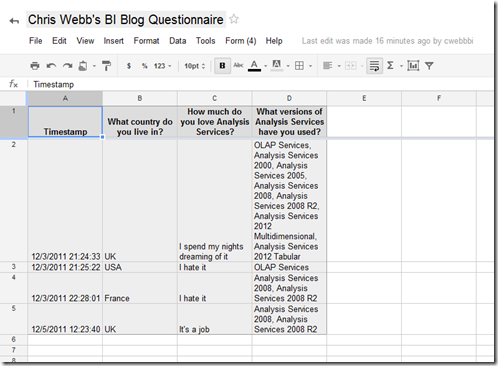
Now when you create a questionnaire like this in Google Forms, the responses get put inside a Google Docs spreadsheet. Here’s the link to the spreadsheet behind my questionnaire:
https://docs.google.com/spreadsheet/ccc?key=0Akv4XYo6s_Z2dDRnNi1fbkotLVd6Q0g4MmhsdFV2OGc
The good thing about Google Docs (unlike, ahem, the Excel Web App) is that it has an API. The contents of this sheet could easily be exported to a number of formats including csv, which means I could get the data into PowerPivot very easily. But there was a problem: the last question is multiple choice, and for the results of that question I got a comma-delimited list of values in a single cell in the spreadsheet (see the above screenshot) – which was not going to be very useful for analysis purposes. What I really wanted was all this data split out into separate columns, one column for each version and containing a boolean value to show if that version has been checked, so if I was going to analyse my responses by version I clearly needed to do some ETL work. I could do this with a calculated column inside PowerPivot of course, but the problem with this is that every time someone wanted to work with this data in a new PowerPivot model they’d have to repeat all this work, which is a pain, and clearly some users wouldn’t have the DAX skills to do this. The best thing to do would be to perform the ETL somewhere up in the cloud so everyone could benefit from it…
Enter Data Explorer. I created a simple mashup with the following steps:
- Imported the data from the Google spreadsheet as a csv file
- Cast that data as a table
- Split the Timestamp column into two separate Date and Time columns
- Added new columns to the table for each version of SSAS that contained the value True if that version had been checked in a particular response, False if not
Apart from the usual struggles that go with learning a new language, it was pretty straightforward and I was impressed with how easy it was to use. Here’s an example of an expression that adds a new column to show whether the respondent checked the “OLAP Services” box in the final question:
= Table.AddColumn(#"Rename Date Time", "Used OLAP Services", each if Text.Contains([#"What versions of Analysis Services have you used?"],"OLAP Services") then "True" else "False")
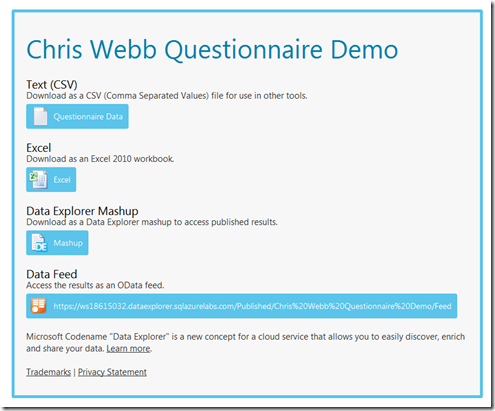
Finally, I published the output of the mashup publicly. This page contains all of the links to download the live data in various different formats:
https://ws18615032.dataexplorer.sqlazurelabs.com/Published/Chris%20Webb%20Questionnaire%20Demo
If you filled in the questionnaire you should be able to find your responses in there because it’s a live feed.
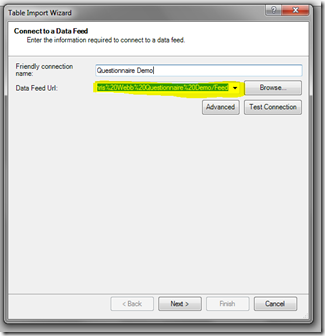
And you can of course import the data into PowerPivot now very easily, for example by using the OData feed from Data Explorer. First, start Excel, go into the PowerPivot window and click on the “From Data Feeds” button:
Then, in the wizard, enter the URL of the OData feed:
And you should then have no problems importing the data:
…and then analysing the responses. You will want to create a simple measure with a definition something like this to do so to count the number of responses:
=COUNTROWS(‘Questionnaire Data’)
I’m looking forward to seeing the data come flooding in!
This approach could easily be applied to scenarios such as analysing feedback from user group meetings or events, and what with the number of online data sources out there there must be hundreds of other potential applications as well. And given that anyone can now publish and sell data on the Windows Azure Marketplace there must be ways of making money from this too…
 |
Chris has been working with Microsoft BI tools since he started using beta 3 of OLAP Services back in the late 90s. Since then he has worked with Analysis Services in a number of roles (including three years spent with Microsoft Consulting Services) and he is now an independent consultant specialising in complex MDX, Analysis Services cube design and Analysis Services query performance problems. His company website can be found at http://www.crossjoin.co.uk and his blog can be found at http://cwebbbi.wordpress.com/ . |


