Q: How can I create Fiscal Date/Time table for PowerPivot if I do not have any source for that?
User Rating: 5 / 5

Q: How can I create Fiscal Date/Time table for PowerPivot if I do not have any source for that and my Fiscal Year starts not in January? I would like to have flexibility in how date fields are calculated.
Majority of PowerPivot application will have date type fields (sometimes called Time) that will be used to build different reports. If you are lucky, then one of your source databases will have a date table that will contain all date attributes. But if you do not have source for your date table, then it is quite easy to create Excel table with our date values and then add it as a linked table to your PowerPivot application.
To build your date table you will need to create one column in excel that will have all your date values. You can do this by:
- In the A1 cell enter name for the parameter "First month in Fiscal year:"
- In the B1 cell enter month number that represents a start of Fiscal year. For example, if your Fiscal year starts in April, you should enter 4.
- In the A2 cell enter name of the column "Date"
- In the A3 cell enter earlies value of your date table, for example "01/01/2005". Note this format might be different for your computer locale. Make sure that Excel understands that this is date type cell
- In the A4 cell enter forumula "=A3+1". This formula will create a value for next day of your date.
- Select cell A4 and then select square dot at the bottom right corner of that cell and drag it down. This will copy formula to rows below and each new row will have date incremented by 1 day. Make sure you create rows for each date that exists is used in your PowerPivot application.
Now it is time to create Excel calculations for parts of the date: week, month, quarter and year. For that just enter in the cells B2, C2, D2... names of the column and then enter in the cells B3, C3, D3, ... formulas from the list below.
List below contains formulas for different calculations. Most likely for your implementation you will want to use just some of the columns. I provided here extended list so you would have something to choose from.
|
Column Name |
Excel Formula |
Sample value |
Notes |
| Fiscal Year | ="FY " & IF(MONTH(A3)<$B$1,YEAR(A3),YEAR(A3)+1) | FY 2010 | Fiscal year (string) |
| Fiscal Qtr | =FLOOR((IF(MONTH(A3)<$B$1,MONTH(A3)+(12-$B$1+1),MONTH(A3)-$B$1+1)-1)/3,1)+1 | 2 | Numeric value of the quarter in the calendar year (number) |
| Fiscal Qtr Name |
="FQtr " & TEXT(FLOOR((IF(MONTH(A3)<$B$1,MONTH(A3)+(12-$B$1+1),MONTH(A3)-$B$1+1)-1)/3,1)+1,"#") | FQtr 3 |
Quarter name (string) |
| Month Number | =IF(MONTH(A3)<$B$1,MONTH(A3)+(12-$B$1+1),MONTH(A3)-$B$1+1) | 4 | Numeric value of the month in the fiscal year. Value 1 will be for the first month in Fiscal year (examle April), etc... (number) |
| Month Name | =RIGHT("0" & IF(MONTH(A3)<$B$1,MONTH(A3)+(12-$B$1+1),MONTH(A3)-$B$1+1),2) & " " & TEXT(A3,"mmmm") | 04 July | Name of the month (string) * |
| Month Name Short | =RIGHT("0" & IF(MONTH(A3)<$B$1,MONTH(A3)+(12-$B$1+1),MONTH(A3)-$B$1+1),2) & " " & TEXT(A3,"mmm") | 04 Jul | Short name of the month (string) * |
| Month Name Custom | =CHOOSE(MONTH(A3),"10-J","11-F","12-M","01-A","02-M","03-J","04-J","05-A","06-S","07-O","08-N","09-D") | 04-J | Custom Month name. You ca easily build list of values yourself (string) |
| YYYY-MM | ="FY " & IF(MONTH(A3)<$B$1,YEAR(A3),YEAR(A3)+1) & "-" & RIGHT("0" & IF(MONTH(A3)<$B$1,MONTH(A3)+(12-$B$1+1),MONTH(A3)-$B$1+1),2) | FY 2010-04 | Year-Month numbers (string) |
| Day | =DAY(A3) | 17 | Day of the month (number) |
| Day Leading Zero | =TEXT(A3,"dd") | 07 | Day of the month, but 1-9 days have leading zero in front of them (string) |
| Day Number In Week | =WEEKDAY(A3,2) | 5 | Day number in week. Parameeter 2 in this function specifies that week starts on Monday. You might want to adjust this parameter to your requirements (number) |
| Day Name Short | =TEXT(WEEKDAY(A3,2),"#")& " " & TEXT(A3,"ddd") | 5 Fri | Day of the week in short format (string) |
| Day Name Long | =TEXT(WEEKDAY(A3,2),"#") & " " & TEXT(A3,"dddd") | 5 Friday | Day of the week (string) ** |
* - We prefixed month names with month number. This way month names will be properly ordered in the list
** - We prefixed weekday names with day number in week. This way weekday names will be properly ordered in the list
I would like to point out that all these formulas are NOT DAX formulas - they are just simple Excel formulas.
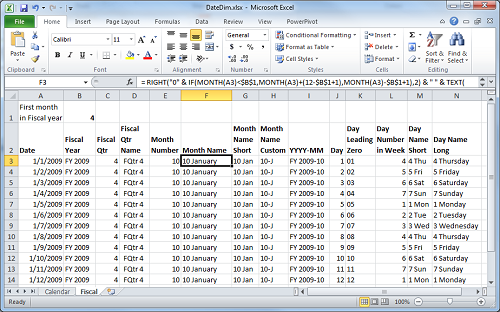
After you added these formulas to your columns, you should copy all formulas down to each row. This way you will calculate columns for all rows. Here is how your Excel sheet will look:
Now you are ready to convert your Excel spreadsheet to table. For that select any cell in your spreadsheet area that contains date values, then select menu item "Insert" and then "Table". New dialog "Create Table" will pop up where you will be able to specify area that represents your table. In the same dialog you also will be able to specify paramter "My Table has headers" value.
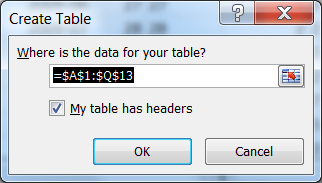
After you will click "OK", data on your Excel sheet will be converted to the table.
To load this new data table into PowerPivot all you have to do is select menu "PowerPivot" and then click on the button "Create Linked Table". After that do not forget to join your date table to your other table.
Are you using different calculations for your PowerPivot implementations? Please share them with community by posting your calculations here in the comments. Thank you for that!
Related topics: